Quick start
- Install TextHeist from the Mac App Store. It runs as a menu-bar utility — there's no Dock icon. Look for the TextHeist glyph on the right side of your menu bar.
-
Press the hotkey (
⌘⇧2by default). The first time, macOS will prompt for Screen Recording permission — that's required to read pixels off your display. After granting, relaunch TextHeist (the prompt has a button for this). The second press of the hotkey will work. - Draw a rectangle around any text on your screen. Drag, release. The TextHeist result popup appears with the OCR'd text, every recognised entity highlighted, and a chip per type in the toolbar.
-
Click a chip — the value is on your clipboard in its
chosen format. Click a highlighted span in the text — same
thing. Hold
⌥to keep the popup open so you can grab more.
The heist (the selection overlay)
The overlay covers every connected display, dims your screen, and shows a crosshair at the cursor. Two modes:
- Crosshair only (default) — matches Apple's built-in screenshot tool. Fast, familiar.
- Magnifier loupe — turn on in Settings → General → Capture → Show magnifier loupe. A circular zoom of the pixels under the cursor, with a pixel grid. Useful for tight rectangles around small text.
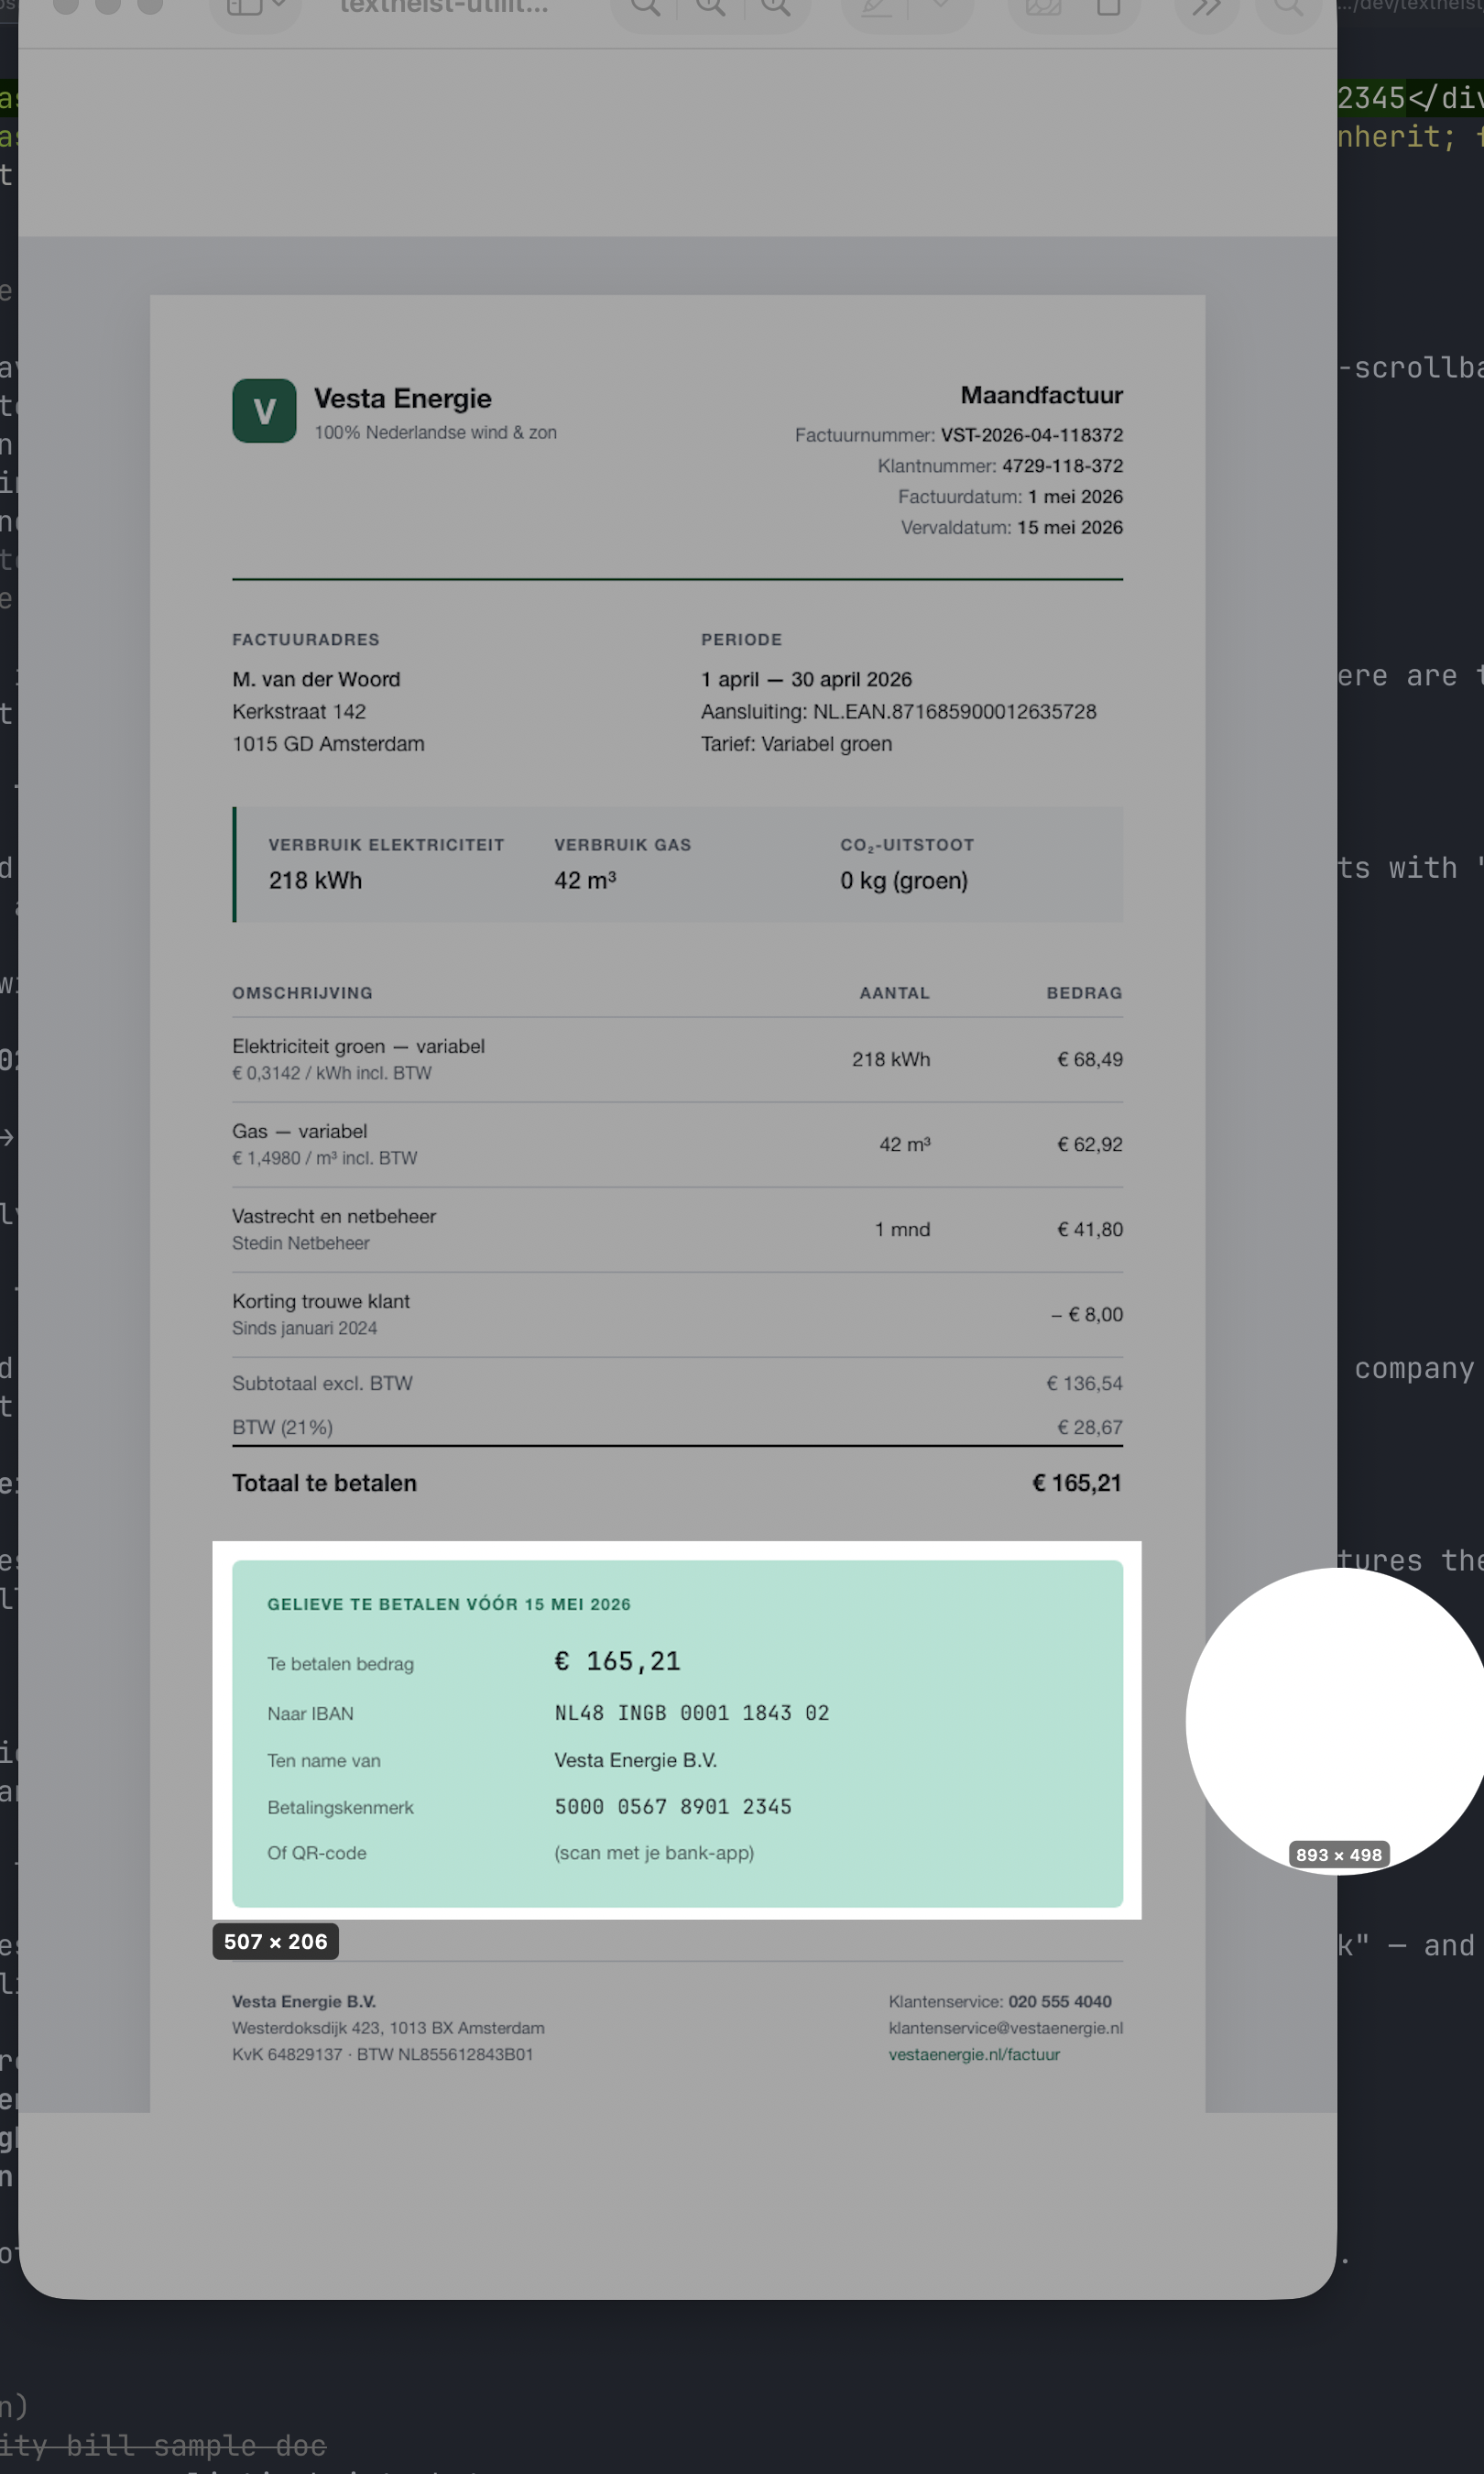
The overlay reads from a one-shot snapshot of your screen taken the moment you pressed the hotkey, not from live screen content. That's why the magnifier doesn't lag and the final crop is pixel-identical to what you were drawing on. Press Escape to cancel. Multi-display and Retina-correct.
The result popup
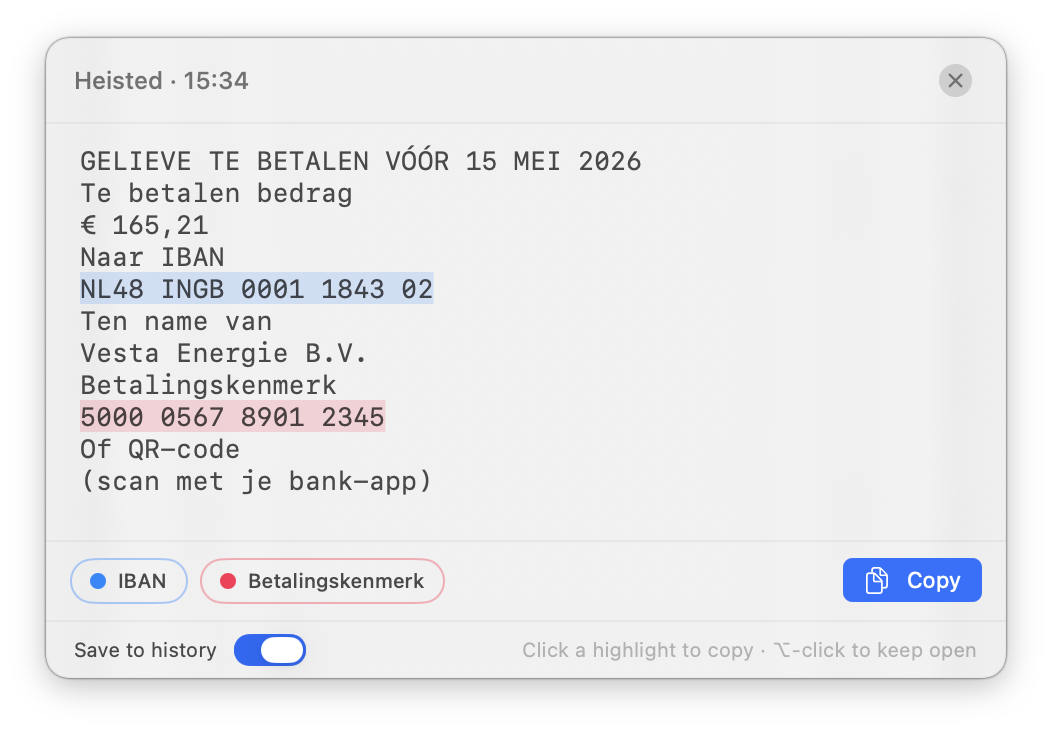
After you release the mouse, TextHeist OCRs the selection with Apple's Vision framework and renders the result in a floating HUD panel — a borderless, draggable, monospaced editor. Three things happen at once:
- Every recognised entity gets a coloured highlight in the text — one colour per type.
- A chip appears in the toolbar for each detected type, with a count if there are multiple matches.
- Each chip already holds the value in its currently-chosen format. One click copies.
Click semantics
- Click a chip with one match
- Copies that value. Popup closes (unless you hold ⌥, see below).
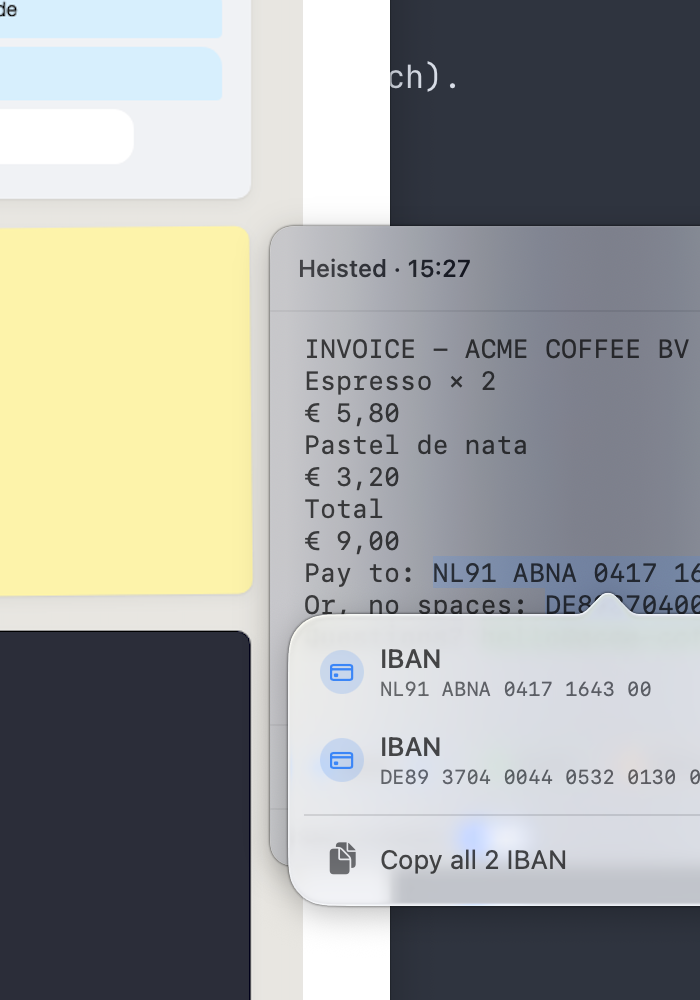
- Click a chip with N > 1 matches
- Opens a popover with one row per match. Click a row to copy that one; click "Copy all N …" to copy them joined.
- Click a highlight in the text
- Copies the value at that span. If the span has multiple validators that accept it (e.g. both a Betalingskenmerk and a credit card), the popover opens with the alternatives.
- Click the Copy button
- Copies the entire recognised text, plain, as-is.
- ⌥-click anywhere
- Inverts the keep-popup-open-after-copy behaviour for that one click. The default is set in Settings → General → Capture.
Built-in detected types
Each built-in entity ships with a pattern for finding it, a real check for verifying it (where one exists), and a set of output formats. You can disable any type — it stops being highlighted and stops appearing in the chip toolbar — and pick its default format in Settings → Extractors.
mailto: link.tel: link.Custom extractor walkthrough — "Vendor order"
The built-ins cover the universal stuff. For the company-specific patterns — your invoice numbers, ticket IDs, SKUs, project keys — you build your own. Here's the full walk-through.
First: what's a "regex"?
Custom extractors use regular expressions — almost always shortened to regex. A regex is a small piece of text that describes a shape, not the actual letters. For example:
\d{4}- "four digits in a row" — matches
2026,0001,9999. [A-Z]{2}- "two uppercase letters" — matches
NL,AB, but notnlorA1. ORD-\d{4}-\d{6}- "literal
ORD-, then four digits, then-, then six digits" — matchesORD-2026-001234.
If regex is new to you, two friendly references:
- Wikipedia · Regular expression — the classic introduction.
- regex101.com — a free in-browser playground for trying out patterns. Pick the "ECMAScript" flavour; it's close to TextHeist's behaviour.
That's all the background you need. From here on we'll just say "regex" without further ceremony.
Scenario. A supplier sends order confirmations
with reference numbers like ORD-2026-001234. Your
own internal tracker stores them in the form
2026-001234 — no prefix, with a dash between the
year and the sequence. You want one click on an email
screenshot to drop the cleaned form on your clipboard.
Step 1 · Open the editor
Click the TextHeist menu-bar glyph → Settings… → Extractors. Scroll to the Custom extractors section at the bottom and press + Add Extractor.
Step 2 · Name + pattern
Fill in:
- Name
Vendor order— this is what appears on the chip in the result popup.- Regex pattern
ORD-\d{4}-\d{6}— literal "ORD-", then four digits (the year), then "-", then six digits (the sequence number).- Case insensitive
- Off. The vendor uses uppercase
ORDconsistently.
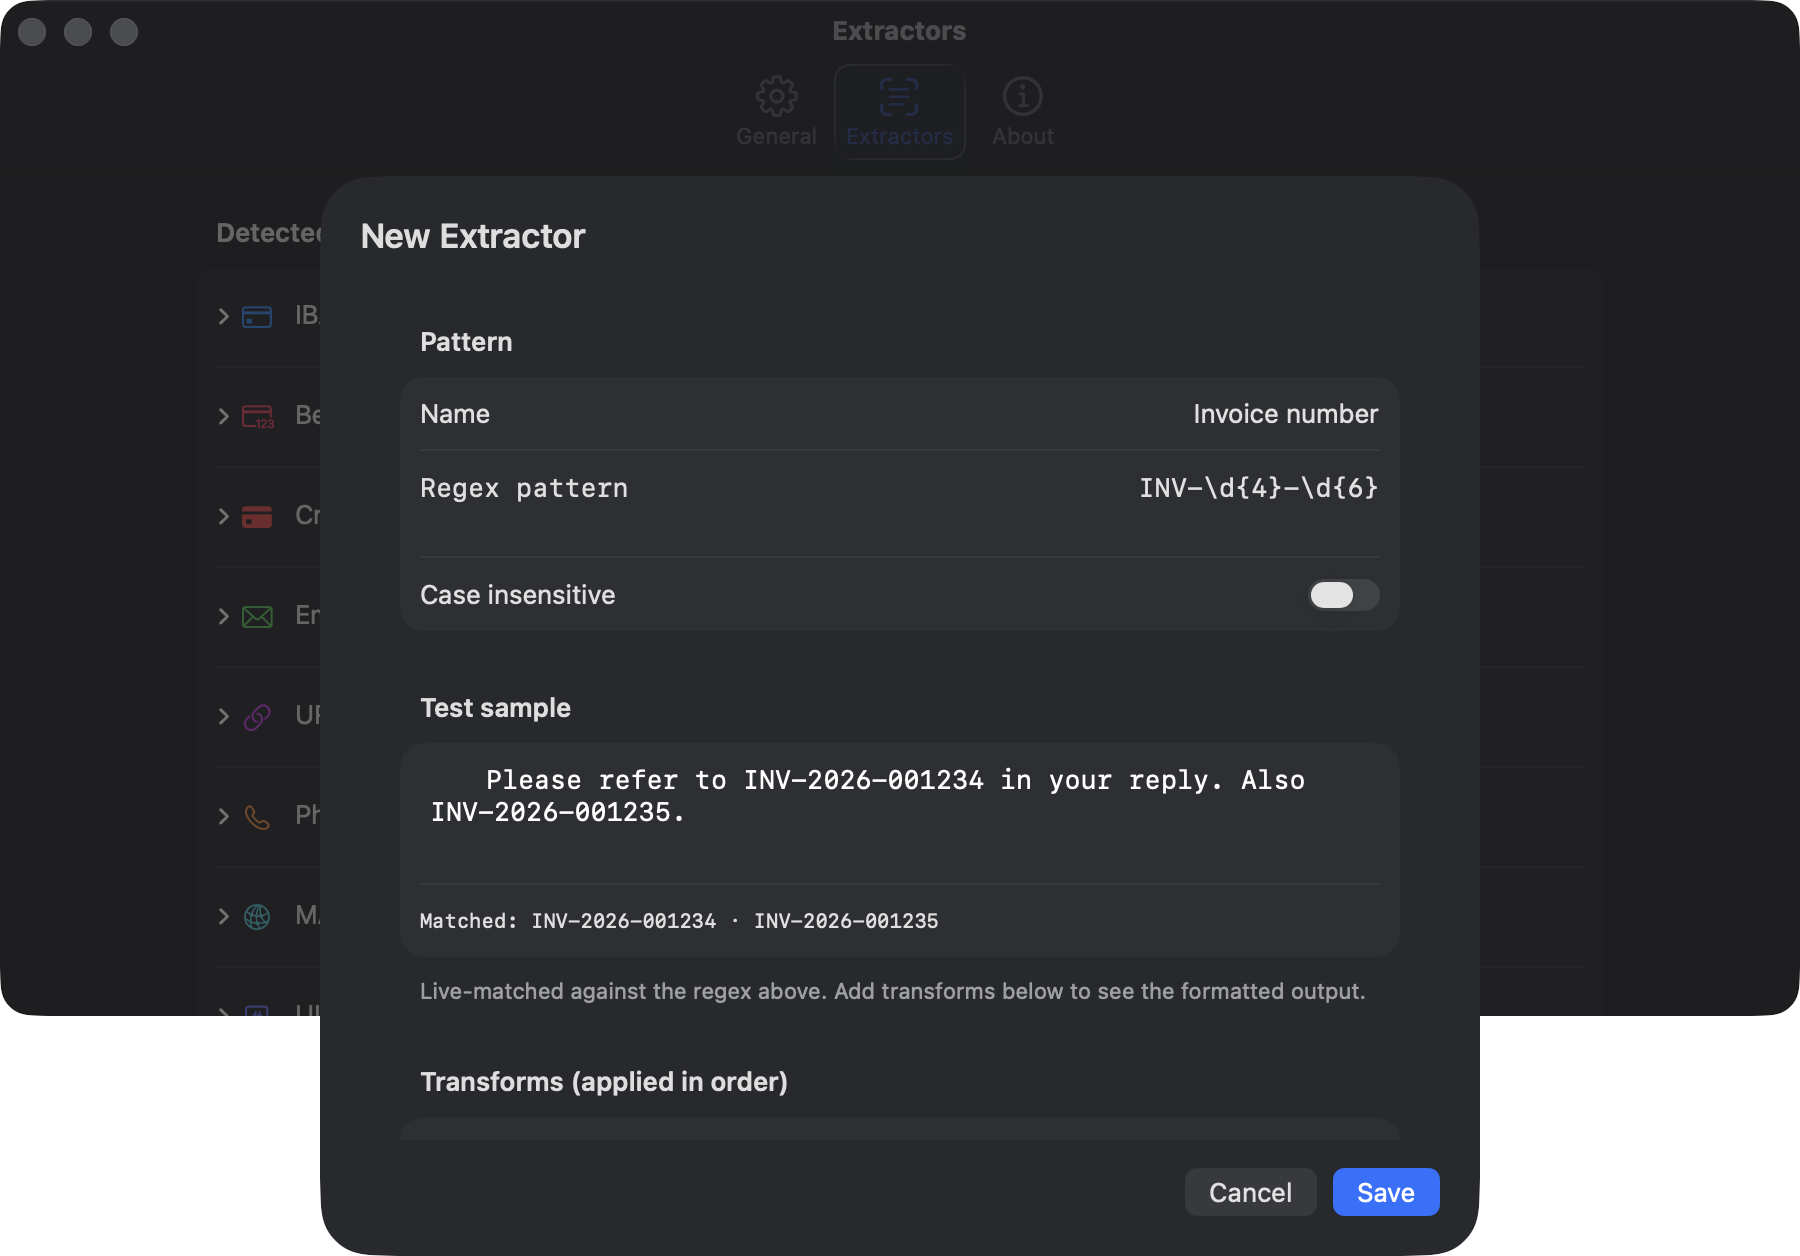
Step 3 · Test sample
Type or paste a realistic test string into the Test sample area:
Please refer to ORD-2026-001234 in your reply.
Also see ORD-2026-001235 for the related credit note.
As you type, the Matched line updates live. You should
see Matched: ORD-2026-001234 · ORD-2026-001235.
Step 4 · Transformation pipeline
The matches are still in the raw form ORD-2026-001234.
Apply two transforms to get the cleaned form 2026-001234:
ORD-2026-001234
→
Find ORD-, Replace (empty)
→
out: 2026001234
→
Find (\d{4})(\d{6}), Replace $1-$2 · regex ✓
→
out: 2026-001234
How to add them in the sheet:
- Click + Add step at the bottom of the sheet → Find & Replace….
- Fill in Find:
ORD-, Replace with: (leave empty). Leave the Regex checkbox off — this is a literal find. - Click + Add step again → Find & Replace….
- Find:
(\d{4})(\d{6}), Replace with:$1-$2. This time tick Regex — the parentheses in the Find pattern create two "groups" (the four-digit year and the six-digit sequence), and$1/$2in the Replace field paste those groups back, separated by a dash.
Each step has an example output that previews from your test
sample. The "After transforms" section at the bottom of the
sheet shows the final value — 2026-001234 · 2026-001235.
Click Save.
Step 5 · Try it
Press your TextHeist hotkey, draw a rectangle around the
sentence "Please refer to ORD-2026-001234 in your reply." The
result popup now has a Vendor order chip in the
toolbar (matching the name from Step 2). Click it. Your
clipboard now holds 2026-001234.
Want to edit the rule later? Same sheet, opened from the pencil icon next to the rule in Settings → Extractors → Custom extractors. Or trash it from the bin icon next to the pencil.
User formats on built-ins
Custom extractors give you new patterns. User formats let you add new output formats on top of any of the ten built-in entities — without losing the validator.
Example: TextHeist's default IBAN format is "Pretty 4-blocks"
(NL48 INGB 0001 1843 02). You want one that
lowercases the result for a system that's case-sensitive.
In Settings → Extractors, expand the IBAN row, click
+ Add Format…, and:
- Name
IBAN lowercase— appears in the format picker under "Your formats" (below the built-ins, separated by a divider).- Base format
- Pretty (4-char groups) — the built-in format whose render output your transforms run on top of.
- Transforms
- Add a single Lowercase step.
Save. The new format appears in the IBAN row's picker. Select
it, and from now on every IBAN you heist hits your clipboard in
the new form nl48 ingb 0001 1843 02.
Built-in formats are read-only — you can't break the ten that ship, only add on top of them.
History
Saving heists is opt-in (toggle: Settings → General → Save heists to history). When on, every successful heist gets saved locally. The thumbnail is the cropped capture, the body is the OCR'd text.
Open the History window from the TextHeist menu-bar menu → History…. Search the search box, click a row, the right pane shows the OCR'd text with the entity highlights applied retroactively. Click a chip; the value goes to your clipboard.
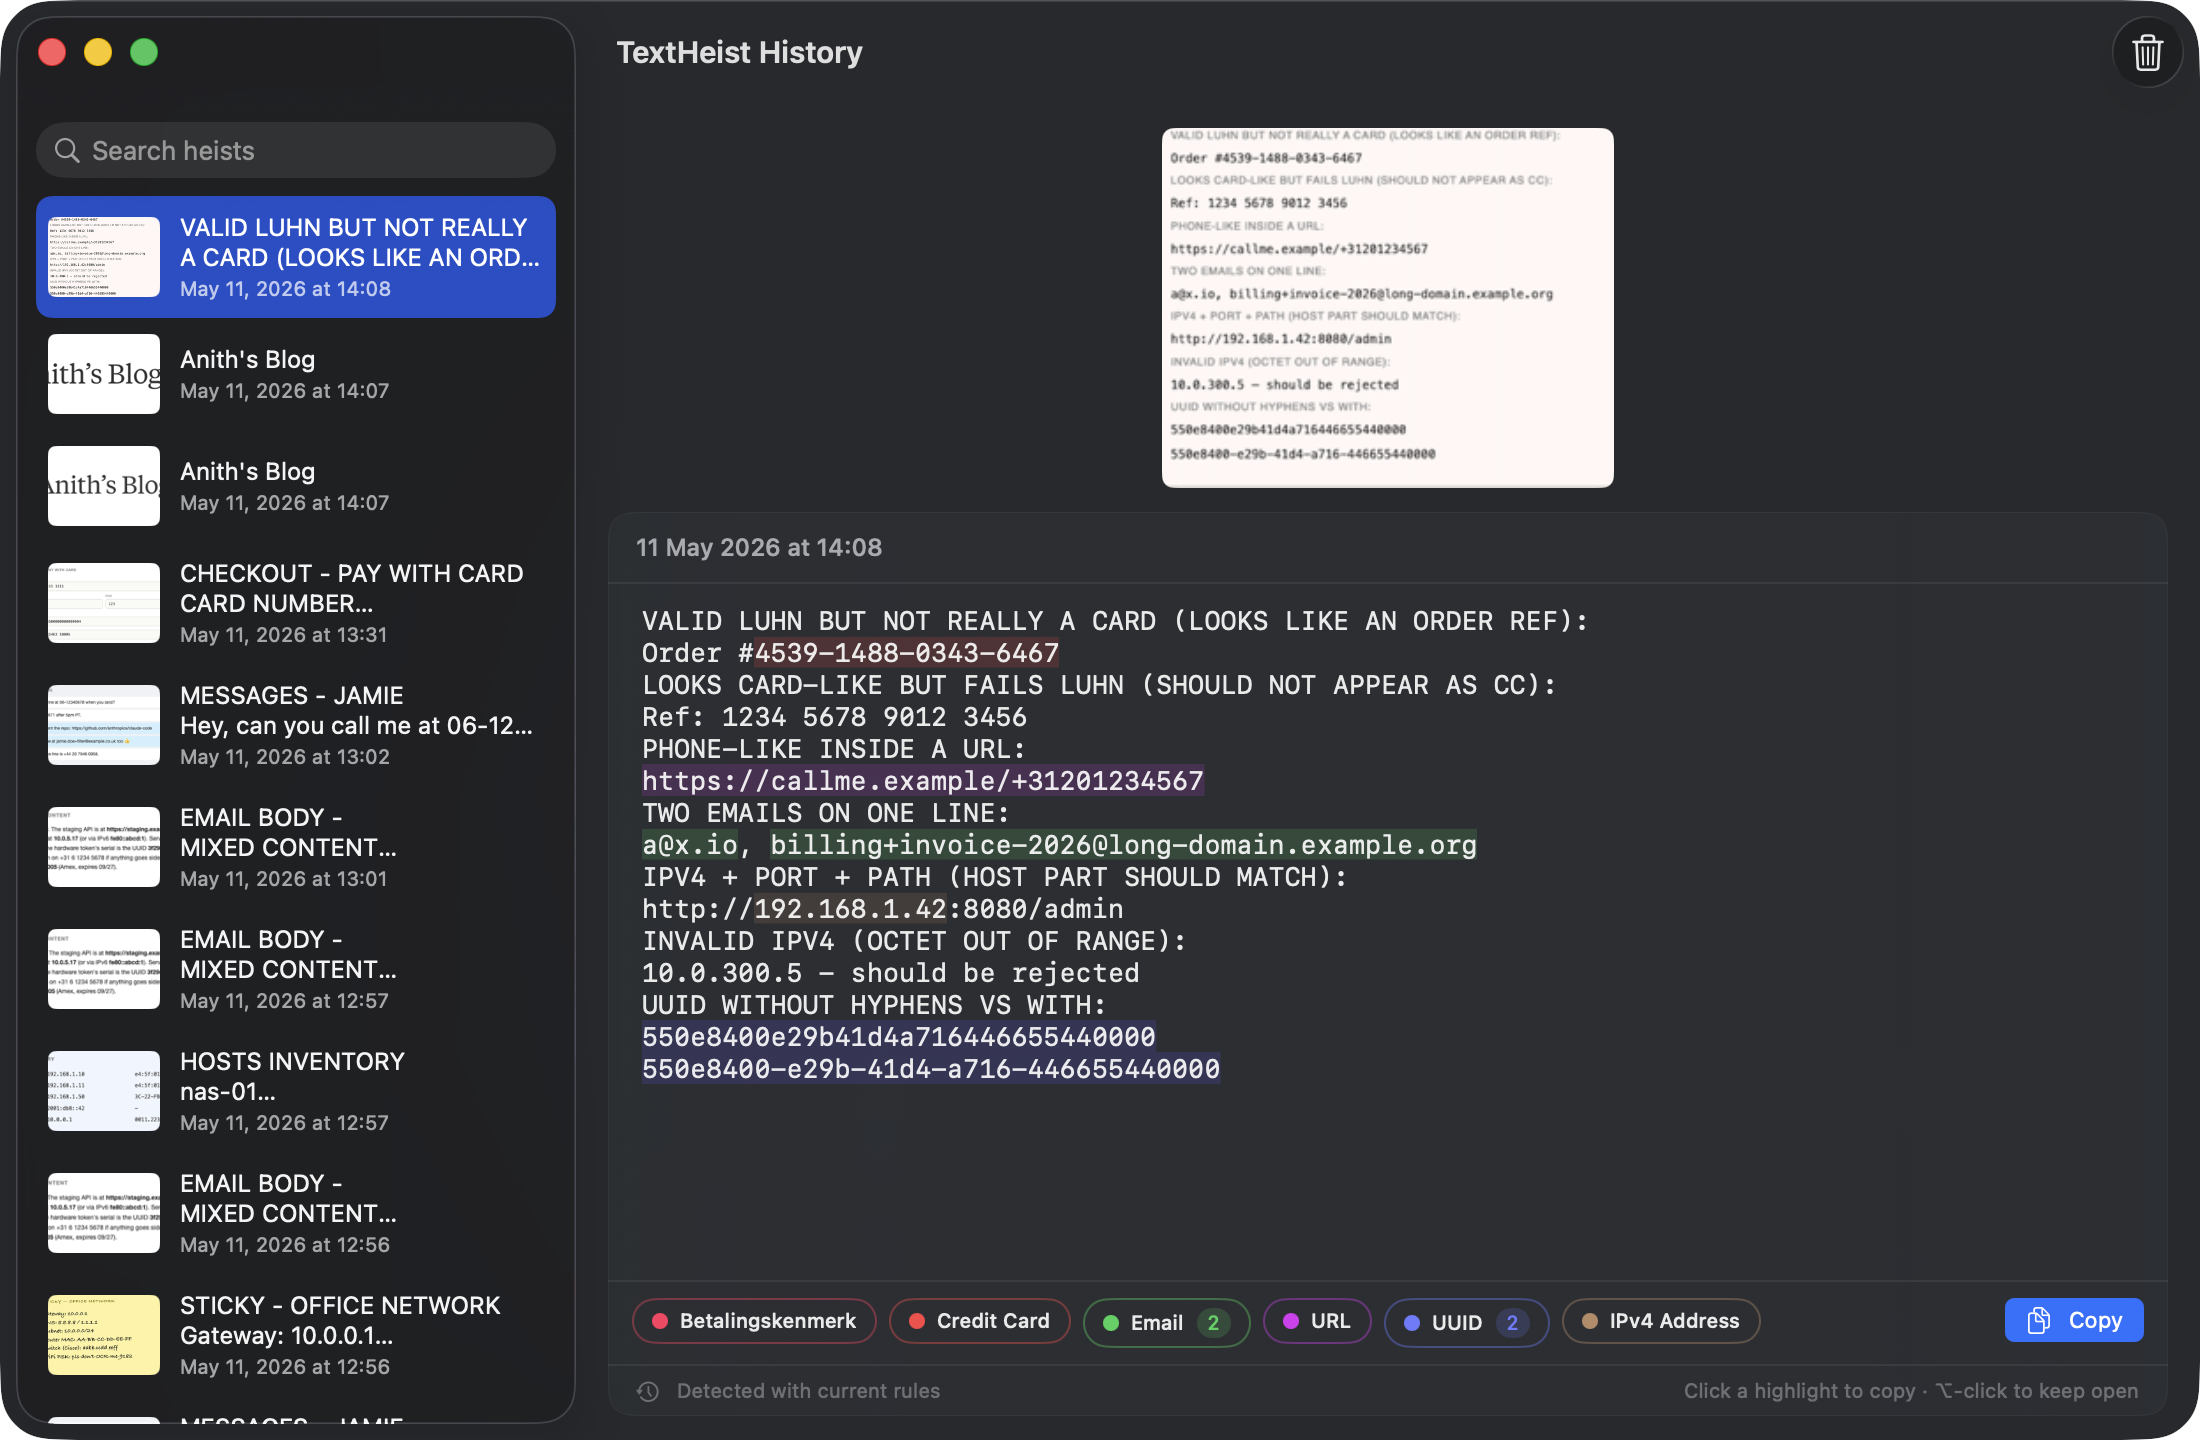
Retention is set in Settings → General → History → Auto-delete after: 7 days, 30 days, 90 days, or Never. Pruning runs at app startup. Clear All History wipes the store immediately; there's a confirmation dialog.
Settings reference
Settings opens to three tabs: General, Extractors, About.
General
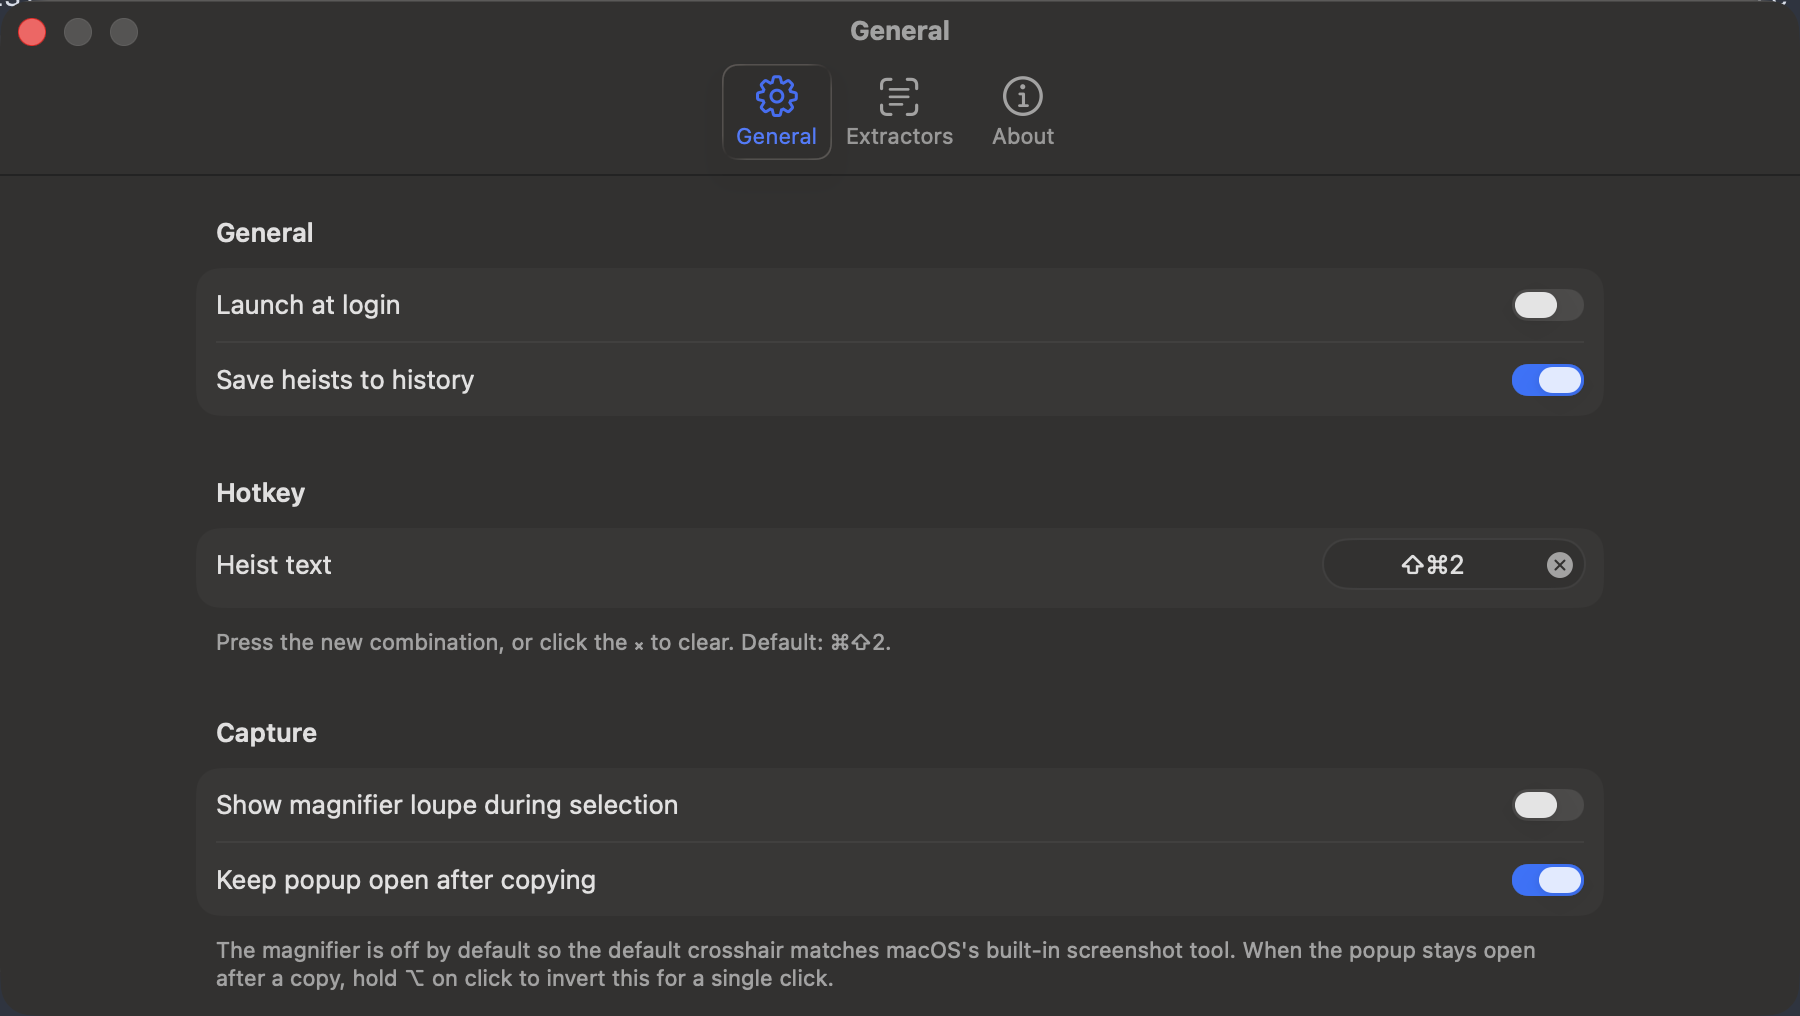
- Launch at login
- Tells macOS to start TextHeist when you log in. Off by default.
- Save heists to history
- On by default. Toggle off if you don't want past heists persisted at all.
- Hotkey · "Heist text"
- The recorder accepts any key combination. Click into it, press the combination, that's the new hotkey. Click the ⨯ to clear.
- Show magnifier loupe during selection
- Off by default — matches Apple's screenshot tool. On = pixel-grid magnifier follows the cursor during selection.
- Keep popup open after copying
- Off by default — clicking a chip copies and closes. On = stays open so you can grab more. ⌥-click on any chip inverts the choice for that one click.
- Auto-delete after
- History retention: 7 / 30 / 90 days, or Never.
- Clear All History
- Wipes the local history store. Confirmation dialog before it actually deletes.
- Screen Recording
- Status indicator. The "Open System Settings" link jumps you to the right pane in System Settings.
Extractors
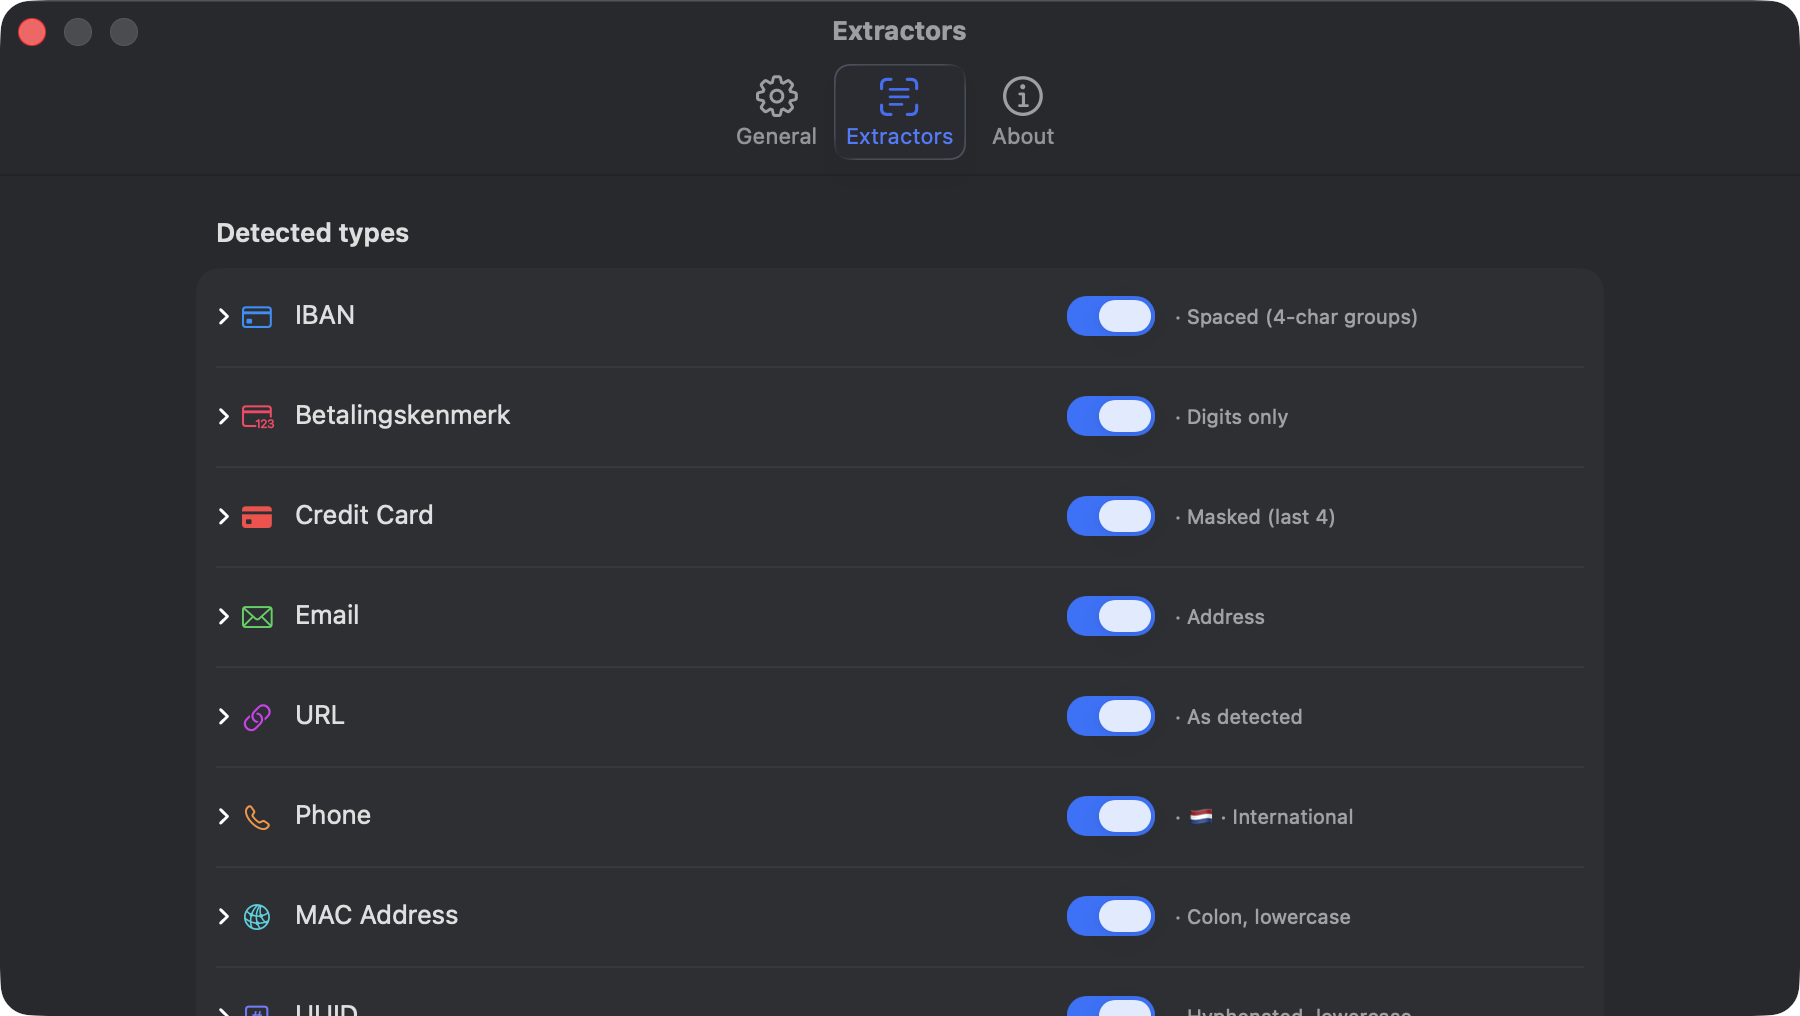
Detected types — one row per built-in. The collapsed row shows the toggle, the current format name, and (for Phone) the region flag. Click the chevron to expand into the per-type panel: a format picker, a region picker (Phone only), an example caption, and your custom user formats with edit/delete plus an + Add Format… button.
Custom extractors — your own regex extractors. Walked through in detail in the previous section.
About
Version number, build, "100% on-device OCR" promise, and links to Website, Privacy, and Support.
Troubleshooting
The hotkey doesn't work after I granted Screen Recording.
macOS caches the permission verdict per running process for the lifetime of that process. Once the OS has told TextHeist "denied", flipping the toggle in System Settings doesn't reach the running app — it'll keep believing it's denied. The fix: quit and relaunch TextHeist. The app's permissions sheet has a "Relaunch TextHeist" button for exactly this reason.
The hotkey doesn't work after a reboot.
macOS sometimes revokes Screen Recording across major updates. Open System Settings → Privacy & Security → Screen Recording and re-enable TextHeist, then relaunch.
macOS shows a "this app might bypass the system private window picker" warning.
No need to worry. macOS 15.1 added that warning for any app that requests the legacy Screen Recording permission instead of using Apple's per-capture window picker. Every drag-a-region screenshot tool in the App Store uses the legacy permission for the same reason: the picker doesn't fit a "draw a rectangle anywhere" flow. TextHeist reads only the pixels you draw a rectangle around, and it does so locally — privacy page.
My custom extractor isn't matching anything.
Open the extractor in the editor (pencil icon next to it in Settings → Extractors). The Test sample area is your playground — paste the OCR'd text that should match and watch the live Matched: line. If it stays empty, the pattern probably isn't quite right; if the regex is outright invalid, an orange warning appears below the field. Common culprits: forgetting that the pattern is case-sensitive by default, or being too strict about what characters can appear between the parts you care about.
The OCR is missing a character / misreading a digit.
Vision's confidence drops on tiny text, unusual fonts, or low-contrast backgrounds. Turn on the magnifier and draw a tighter rectangle — fewer pixels of irrelevant context tends to help. The OCR'd text is editable directly in the result popup if you need to nudge one character.
Reporting a bug
Email support@lambda-m.nl with:
- Your macOS version (e.g. 15.4 Sequoia, 26.4 Tahoe).
- The TextHeist version (Settings → About).
- What you did, what happened, what you expected to happen.
- If a specific heist triggered the issue, the recognised text — but please do not send screenshots that contain sensitive content. We don't need them, and neither do you.